Most teams can cut their AWS bill by 20 to 40 percent without enterprise tooling, six-month implementations, or a dedicated FinOps team. The highest-leverage moves come down to a handful of practices: right-size EC2 with Compute Optimizer, switch eligible workloads to Graviton for an immediate 20 percent saving, pick the right Savings Plan, clean up the idle EBS volumes and Elastic IPs that accumulate silently, and set up Cost Anomaly Detection so the next 30 percent spike shows up as an alert instead of a surprise on the monthly invoice.
This guide covers each of those practices with the specific configuration steps and numbers that matter.
Why AWS Costs Get Out of Control
Before jumping into fixes, it helps to understand why AWS bills spiral:
- Pricing complexity: AWS has over 300 services, each with its own pricing model. EC2 alone has on-demand, reserved, savings plans, spot, and dedicated host pricing — across hundreds of instance types.
- No visibility by default: AWS gives you Cost Explorer for free, but most teams don't configure it properly. Without tags and account structure, you can't answer "which team spent what."
- Over-provisioned resources: Teams pick instance sizes based on peak load estimates, then never revisit. The result: 40-60% of compute capacity sits unused.
- Idle resources accumulate: That test environment from last quarter, the unattached EBS volumes from terminated instances, the Elastic IPs nobody remembers reserving — they all cost money every hour.
- No commitment strategy: You're paying on-demand rates for workloads that run 24/7 and haven't changed in months.
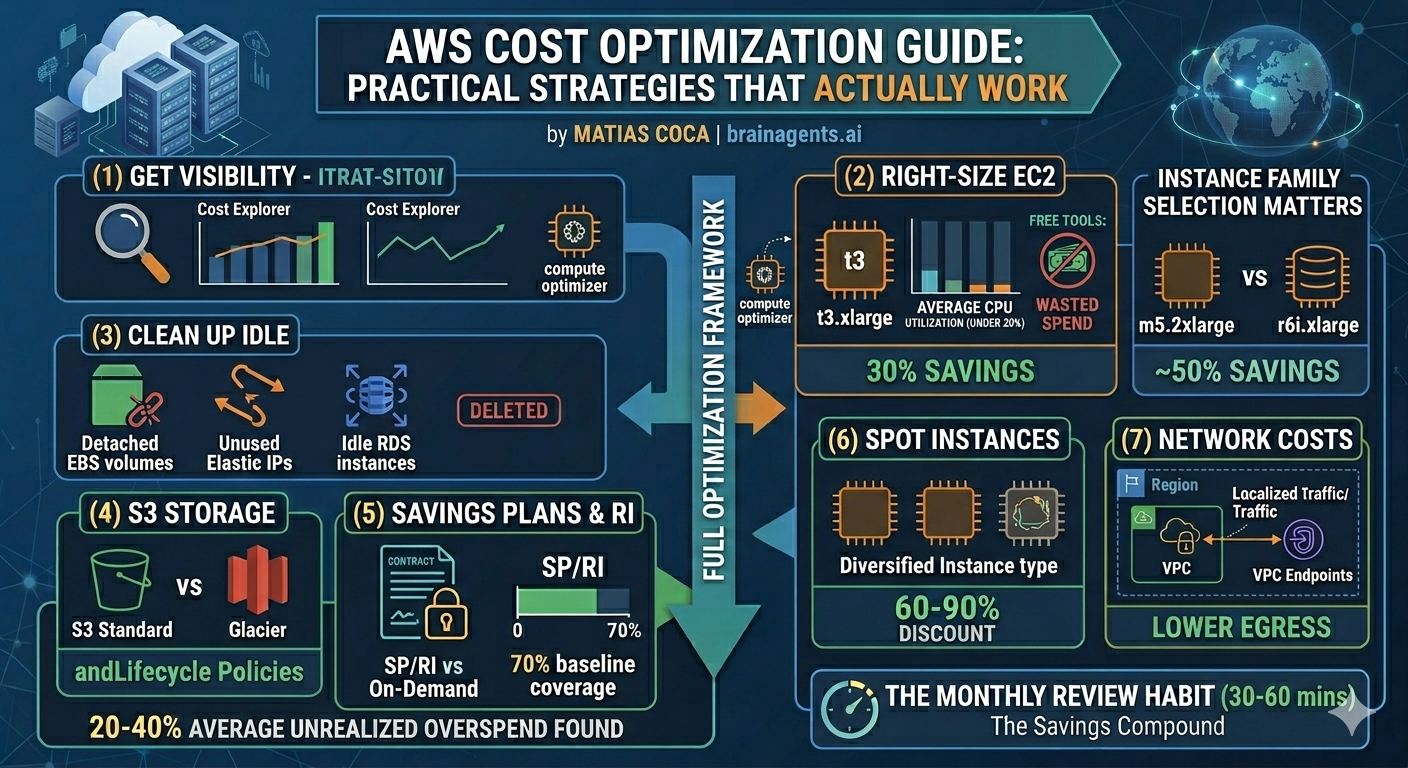
Step 1: Get Visibility Right
You can't optimize what you can't see. AWS provides several free tools for cost visibility — the trick is knowing which ones matter.
Enable Cost Explorer (if you haven't)
Cost Explorer is free and gives you a visual breakdown of spend over time. It's not enabled by default on all accounts.
Go to Billing → Cost Explorer → Launch Cost Explorer. It takes 24 hours to populate historical data.
What to look for first:
- Daily cost trend: Is spend stable, growing, or spiking?
- Top 5 services: Where is most of the money going?
- Cost by account: If you're using AWS Organizations, which accounts drive spend?
Set Up Cost Allocation Tags
Tags are the foundation of cost attribution. Without them, you know THAT money was spent but not WHERE or BY WHOM.
Recommended tags:
| Tag | Purpose | Example |
|---|---|---|
Environment | Separate prod from dev/staging | production, staging, dev |
Team | Attribute costs to teams | platform, data, backend |
Project | Track spend by initiative | customer-api, ml-pipeline |
Owner | Accountability | [email protected] |
- Go to Billing → Cost allocation tags
- Activate your user-defined tags (they must already exist on resources)
- Wait 24 hours for tags to appear in Cost Explorer
Enable Cost Anomaly Detection
This is a free AWS feature that uses ML to detect unusual spending patterns and alerts you automatically.
Setup: Billing → Cost Anomaly Detection → Create monitor
Create two monitors:
- Service monitor: Detects spikes in any AWS service
- Account monitor: Detects spikes in any linked account (if using Organizations)
Set alert thresholds based on your tolerance — a 20% daily increase is a reasonable starting point for most teams.
This catches the kind of surprises that otherwise show up as a shock on the monthly invoice: a forgotten test cluster, a misconfigured auto-scaling group, or a data transfer spike from a new deployment.
Step 2: Right-Size EC2 Instances
EC2 is typically the #1 line item on AWS bills, and most instances are over-provisioned.
How to Find Oversized Instances
AWS Compute Optimizer (free) analyzes your EC2 usage and recommends better instance types:
- Go to Compute Optimizer → EC2 instances
- Look for instances flagged as "Over-provisioned"
- Review the recommended instance type and projected savings
- Average CPU under 40% → likely over-provisioned
- Memory utilization consistently under 50% → consider a smaller instance family
- Network throughput well below instance limits → you're paying for bandwidth you don't use
Instance Family Selection Matters
Picking the right instance family is often more impactful than just sizing down:
| Workload | Common Mistake | Better Choice | Savings |
|---|---|---|---|
| Web servers | m5.xlarge (general purpose) | c6i.large (compute optimized) | 40-50% |
| Databases | r5.2xlarge (oversized memory) | r6i.xlarge (right-sized memory) | ~50% |
| Batch processing | On-demand m5 instances | Spot c6i instances | 60-90% |
| Dev/test | Same instance as production | t3/t3a burstable instances | 50-70% |
Graviton Instances: Easy 20% Savings
AWS Graviton (ARM-based) instances are 20% cheaper than equivalent x86 instances and often perform better. If your workload runs on Linux and doesn't require x86-specific binaries:
m6ginstead ofm6ic7ginstead ofc7ir7ginstead ofr7i
Step 3: Clean Up Idle Resources
Idle resources are the easiest savings — you're paying for things nobody uses. Common culprits on AWS:
Unattached EBS Volumes
When you terminate an EC2 instance, its EBS volumes often survive. They keep costing you money even with no instance attached.
How to find them:
- EC2 → Volumes → Filter by "State: available"
- Any volume in "available" state is unattached and costing you money
Typical waste: A single 500GB gp3 volume costs ~$40/month. Ten forgotten volumes = $400/month for nothing.
Before deleting: Snapshot the volume first if you're unsure whether the data is needed. Snapshots cost a fraction of live volumes.
Unused Elastic IPs
An Elastic IP attached to a running instance is free. An unattached Elastic IP costs $3.60/month (since Feb 2024, AWS charges for ALL public IPv4 addresses).
How to find them: EC2 → Elastic IPs → look for IPs with no associated instance.
Idle RDS Instances
Database instances that serve no traffic but run 24/7 are common — dev databases, staging environments, databases from decommissioned projects.
How to find them:
- CloudWatch → RDS metrics → DatabaseConnections
- Any instance with near-zero connections for 2+ weeks is a candidate
Options:
- Stop the instance (up to 7 days, then it auto-starts — set a reminder)
- Snapshot and delete for instances not needed regularly
- Use Aurora Serverless v2 for dev/test databases that need to exist but are rarely used
Old Snapshots and AMIs
Snapshots accumulate silently. Every time someone creates a backup "just in case," it persists forever unless explicitly deleted.
How to audit:
- EC2 → Snapshots → Sort by creation date
- Look for snapshots older than 90 days
- Cross-reference with existing volumes — if the source volume is deleted, do you still need the snapshot?
Step 4: Optimize S3 Storage Costs
S3 is deceptively expensive at scale. The per-GB price looks cheap, but costs compound across storage classes, request fees, and data transfer.
Use Lifecycle Policies
Most S3 data follows a predictable access pattern: frequent access for the first 30 days, occasional access for 90 days, then rarely or never again.
Recommended lifecycle policy:
| Age | Storage Class | Cost (per GB/month) |
|---|---|---|
| 0-30 days | S3 Standard | $0.023 |
| 30-90 days | S3 Infrequent Access | $0.0125 |
| 90-365 days | S3 Glacier Instant Retrieval | $0.004 |
| 365+ days | S3 Glacier Deep Archive | $0.00099 |
How to implement: S3 → Bucket → Management → Lifecycle rules
Enable S3 Intelligent-Tiering
If you're unsure about access patterns, S3 Intelligent-Tiering automatically moves objects between tiers based on actual access. It charges a small monitoring fee ($0.0025/1,000 objects) but eliminates manual lifecycle management.
Best for buckets where access patterns are unpredictable or mixed.
Watch for Request Costs
S3 charges per request, not just per GB stored. A bucket serving millions of small-object reads can generate significant request costs even if the storage volume is small.
Common traps:
- Web assets served directly from S3 without CloudFront → high GET request costs + data transfer
- Logging buckets with millions of tiny objects → LIST operations become expensive
- Applications that poll S3 for changes instead of using S3 Event Notifications
Step 5: Savings Plans vs Reserved Instances
If you have predictable workloads running 24/7, you're overpaying on on-demand rates. AWS offers two commitment mechanisms:
Savings Plans (Recommended for Most Teams)
Savings Plans are simpler and more flexible than Reserved Instances:
| Type | Discount | Flexibility |
|---|---|---|
| Compute Savings Plans | Up to 66% | Any instance family, size, OS, region, or tenancy |
| EC2 Instance Savings Plans | Up to 72% | Locked to instance family and region, flexible on size and OS |
- Go to Cost Explorer → Savings Plans → Recommendations
- AWS analyzes your last 7/30/60 days of usage
- It recommends a specific hourly commitment amount
- Start with the 1-year, No Upfront option (lowest risk, still significant savings)
Reserved Instances (Still Useful for Specific Cases)
RIs offer slightly higher discounts than Savings Plans for specific instance types but are less flexible:
- Standard RIs: Up to 72% savings, locked to specific instance type and region
- Convertible RIs: Up to 66% savings, can change instance family
- RDS databases (Savings Plans don't cover RDS)
- ElastiCache instances (same reason)
- OpenSearch/Elasticsearch instances
- Redshift clusters
The Math That Matters
For a team spending $10,000/month on EC2:
| Strategy | Monthly Cost | Annual Savings |
|---|---|---|
| All on-demand | $10,000 | $0 |
| Compute Savings Plan (70% coverage, 1yr) | $7,200 | $33,600 |
| EC2 Instance Savings Plan (70% coverage, 1yr) | $6,800 | $38,400 |
| Compute Savings Plan (70%, 3yr, all upfront) | $5,500 | $54,000 |
Step 6: Leverage Spot Instances for Fault-Tolerant Workloads
Spot instances offer 60-90% savings over on-demand but can be interrupted with 2 minutes' notice. They're ideal for:
- Batch processing: Data pipelines, ETL jobs, image processing
- CI/CD: Build and test runners
- Stateless web servers: Behind a load balancer with auto-scaling
- Machine learning training: Checkpoint-enabled training jobs
- Use mixed instance policies in Auto Scaling groups (combine on-demand + spot)
- Diversify across multiple instance types and Availability Zones
- Implement graceful shutdown handling for the 2-minute interruption notice
- Use Spot Fleet or EC2 Fleet for automatic capacity management
- Databases
- Single-instance applications
- Workloads that can't tolerate interruptions
- Long-running jobs without checkpointing
Step 7: Network and Data Transfer Costs
Data transfer is the "hidden tax" on AWS bills. Ingress is free, but everything else costs money:
| Transfer Type | Cost |
|---|---|
| Internet egress (first 10 TB) | $0.09/GB |
| Cross-region transfer | $0.01-0.02/GB |
| Cross-AZ transfer | $0.01/GB each way |
| Same-AZ transfer (private IP) | Free |
| To CloudFront | Reduced rates |
Quick Wins for Network Costs
- Use VPC endpoints for S3 and DynamoDB — eliminates NAT Gateway data processing charges ($0.045/GB)
- Keep services in the same AZ when possible — cross-AZ transfer adds up fast with microservices
- Use CloudFront for content delivery — cheaper egress rates than direct S3/EC2
- Compress responses — gzip/brotli compression reduces transfer volume by 70-80%
- Review NAT Gateway costs — they charge per GB processed, which surprises teams running large data transfers through private subnets
Monthly Cost Review Framework
Run this process monthly to catch waste before it accumulates:
Week 1: Quick Review (30 minutes)
- [ ] Check Cost Explorer for spending trends and anomalies
- [ ] Review Cost Anomaly Detection alerts from the past month
- [ ] Compare spend to previous month — investigate any increase over 10%
Week 2: Resource Audit (1 hour)
- [ ] Check Compute Optimizer for oversized EC2 instances
- [ ] List unattached EBS volumes and unused Elastic IPs
- [ ] Review RDS instances with near-zero connections
- [ ] Audit snapshots and AMIs older than 90 days
Week 3: Optimization Actions (2 hours)
- [ ] Right-size the top 5 oversized instances
- [ ] Delete confirmed idle resources (snapshot first if uncertain)
- [ ] Apply or update S3 lifecycle policies on large buckets
- [ ] Review and apply Savings Plan recommendations
Week 4: Planning (30 minutes)
- [ ] Review Savings Plan utilization — are you under-committed or over-committed?
- [ ] Check for new services or workloads that should be tagged
- [ ] Plan next month's optimization focus
Common Mistakes to Avoid
- Buying commitments too early: Don't purchase Savings Plans or RIs until you have 2-3 months of stable usage data. Premature commitments lock you into resources you might not need.
- Ignoring data transfer costs: Teams optimize compute and storage but ignore the $0.09/GB egress charges that quietly become a top-5 line item.
- Over-committing on Reserved Instances: RIs for instances that get replaced, resized, or decommissioned within the commitment period are wasted money. When in doubt, use Savings Plans instead.
- Forgetting about dev/test environments: Production gets all the optimization attention while dev and staging environments run the same instance sizes 24/7. Schedule dev environments to stop outside business hours — that alone saves 65%.
- Not tagging from day one: Retroactive tagging is painful and incomplete. Make tagging part of your infrastructure-as-code templates from the start.
- Treating Spot as unreliable: Spot interruption rates are low for diversified instance type selections. Teams that dismiss Spot leave 60-90% savings on the table for workloads that would handle it fine.
Getting Started
- Today: Enable Cost Explorer and Cost Anomaly Detection (5 minutes)
- This week: Activate cost allocation tags, audit unattached EBS volumes and unused Elastic IPs
- This month: Right-size top 10 oversized instances, set up S3 lifecycle policies
- Next month: Evaluate Savings Plans based on 30-day usage data
Struggling with AWS costs across multiple accounts and services? Brain Agents AI helps teams optimize cloud spend across GCP, AWS, and Azure — without enterprise complexity or a dedicated FinOps team.
Related Articles:
- Azure Cost Optimization Guide: Practical Strategies That Actually Work
- Multi-Cloud Cost Management: How to Stop Losing Money Across AWS, Azure, and GCP
- Tracking AI and ML Costs Across Clouds: A Practical Guide
- AI Agents for Cloud Costs: Why Your FinOps Team Needs Them Now
- GCP Cost Optimization Guide for Growing Companies
- GCP Network Egress and Cross-Region Costs: The Hidden Bill Nobody Expects